Kea Stork 是用于集中管理与监控 Kea DHCP 服务的可视化平台。
Stork【入门篇】#
Stork 提供了一个基于网页的图形界面,用于监控、排障和维护 Kea DHCP 服务器的配置。Stork 为 Kea 服务器提供了统一的管理入口,包括与 LDAP 的集成,用于管理员的身份验证和权限控制。通过图形界面,网络管理员可以轻松地对 DHCP 服务进行配置更新,而无需面对不熟悉的命令行操作。
- Stork管理多台 DHCP 服务器: 通过 stork agent
- DHCP 服务器: Kea、BIND
安装部署#
环境依赖#
- Ubuntu 22.04
- PostgreSQL
stork-server#
- 安装
# 添加源
curl -1sLf 'https://dl.cloudsmith.io/public/isc/stork/setup.deb.sh' | bash

# 获取版本
apt-cache madison isc-stork-server
apt-cache madison isc-stork-agent

# 安装服务端、代理
apt install isc-stork-server isc-stork-agent
- 数据库
- 创建文件:
vi compose.yml - 创建网络:
docker network create service - 运行容器:
docker compose up -d
services:
  postgres:
    image: postgres:16-alpine
    container_name: postgres
    restart: unless-stopped
    mem_limit: "512m"
    cpus: "0.5"
    environment:
      TZ: "Asia/Shanghai"
      POSTGRES_HOST_AUTH_METHOD: "trust"
      POSTGRES_PASSWORD: "postgres"
    ports:
      - "5432:5432"
    networks:
      - service
    healthcheck:
      test: ['CMD', 'pg_isready', '-U', 'postgres']
    volumes:
      - type: tmpfs
        target: /dev/shm
        tmpfs:
          # 128*2^20 bytes = 128Mb
          size: 134217728
      - /usr/local/src/postgres/data:/var/lib/postgresql/data
networks:
  service:
    external: true
- 数据库创建
postgres=# CREATE USER stork WITH PASSWORD 'stork';
CREATE ROLE
postgres=# CREATE DATABASE stork;
CREATE DATABASE
postgres=# GRANT ALL PRIVILEGES ON DATABASE stork TO stork;
GRANT
postgres=# \c stork
You are now connected to database "stork" as user "postgres".
stork=# GRANT ALL PRIVILEGES ON SCHEMA public TO stork;
GRANT
stork=# create extension pgcrypto;
CREATE EXTENSION
- 配置 /etc/stork/server.env
### database settings
### the address of a PostgreSQL database
STORK_DATABASE_HOST=127.0.0.1
### the port of a PostgreSQL database
STORK_DATABASE_PORT=5432
### the name of a database
STORK_DATABASE_NAME=stork
### the username for connecting to the database
STORK_DATABASE_USER_NAME=stork
### the SSL mode for connecting to the database
### possible values: disable, require, verify-ca, or verify-full
# STORK_DATABASE_SSLMODE=
### the location of the SSL certificate used by the server to connect to the database
# STORK_DATABASE_SSLCERT=
### the location of the SSL key used by the server to connect to the database
# STORK_DATABASE_SSLKEY=
### the location of the root certificate file used to verify the database server's certificate
# STORK_DATABASE_SSLROOTCERT=
### the password for the username connecting to the database
### empty password is set to avoid prompting a user for database password
STORK_DATABASE_PASSWORD=stork
- 启动服务
systemctl enable isc-stork-server.service
systemctl start isc-stork-server.service
systemctl status isc-stork-server.service
stork-agent#
- 安装
# 添加源
curl -1sLf 'https://dl.cloudsmith.io/public/isc/stork/setup.deb.sh' | bash

# 获取版本
apt-cache madison isc-stork-agent

# 安装服务端、代理
apt install isc-stork-agent
一、命令方式#
stork-agent register
root@debian:/etc/stork# stork-agent register
Enter the URL of the Stork server: http://10.64.35.31:8080
Enter the Stork server access token (optional):
Enter IP address or FQDN of the host with Stork agent (for the Stork server connection) [debian]: 10.64.35.31
Enter port number that Stork Agent will listen on [8080]: 8085
INFO[2025-12-19 09:47:56]         register.go:95    Forced agent certificates regeneration.
INFO[2025-12-19 09:47:56]         register.go:398   =============================================================================
INFO[2025-12-19 09:47:56]         register.go:399   AGENT TOKEN: BBE994F89DBC15FF521492408A1C9182D0C4C7DE95EEC5FC4A6D70FA74B86C7E
INFO[2025-12-19 09:47:56]         register.go:400   =============================================================================
INFO[2025-12-19 09:47:56]         register.go:405   Machine will be automatically registered using the server token
INFO[2025-12-19 09:47:56]         register.go:406   Agent token is printed above for informational purposes only
INFO[2025-12-19 09:47:56]         register.go:407   User does not need to copy or verify the agent token during registration via the server token
INFO[2025-12-19 09:47:56]         register.go:408   It will be sent to the server but it is not directly used in this type of machine registration
INFO[2025-12-19 09:47:56]         register.go:416   Try to register agent in Stork Server
INFO[2025-12-19 09:47:56]         register.go:273   Machine registered
INFO[2025-12-19 09:47:56]         register.go:294   Stored agent-signed cert and CA cert
INFO[2025-12-19 09:47:56]            agent.go:109   Loaded server cert
INFO[2025-12-19 09:47:56]            agent.go:92    Loaded CA cert
INFO[2025-12-19 09:47:56]            agent.go:109   Loaded server cert
INFO[2025-12-19 09:47:56]            agent.go:92    Loaded CA cert
INFO[2025-12-19 09:47:56]         register.go:353   Machine ping over TLS: OK
INFO[2025-12-19 09:47:56]             main.go:314   Registration completed successfully
二、配置文件#
配置文件方式需要在 Stork Dashboard 中进行手动点击认证!
- /etc/stork/agent.env
- 启动服务:
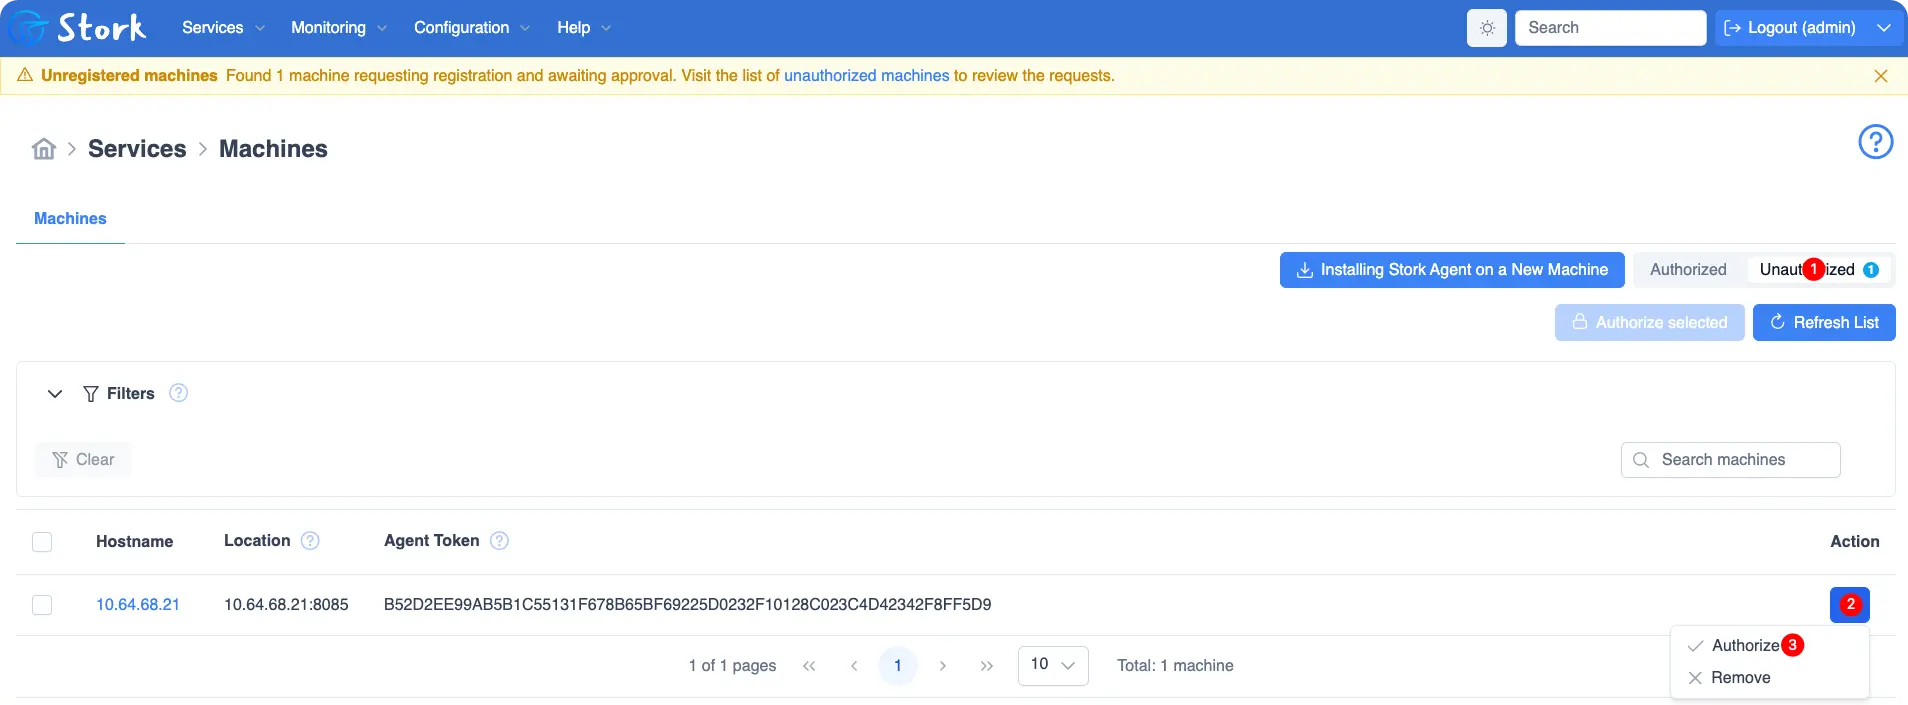
systemctl start isc-stork-agent.service - 页面认证: Services -> Machines -> Unauthorized -> 选择主机点击认证
### the IP or hostname to listen on for incoming Stork server connections
STORK_AGENT_HOST=10.64.35.31

### the TCP port to listen on for incoming Stork server connections
STORK_AGENT_PORT=8085

### listen for commands from the Stork server only, but not for Prometheus requests
# STORK_AGENT_LISTEN_STORK_ONLY=true

### listen for Prometheus requests only, but not for commands from the Stork server
# STORK_AGENT_LISTEN_PROMETHEUS_ONLY=true

### settings for exporting stats to Prometheus
### the IP or hostname on which the agent exports Kea statistics to Prometheus
# STORK_AGENT_PROMETHEUS_KEA_EXPORTER_ADDRESS=
### the port on which the agent exports Kea statistics to Prometheus
# STORK_AGENT_PROMETHEUS_KEA_EXPORTER_PORT=
## enable or disable collecting per-subnet stats from Kea
# STORK_AGENT_PROMETHEUS_KEA_EXPORTER_PER_SUBNET_STATS=true
### the IP or hostname on which the agent exports BIND 9 statistics to Prometheus
# STORK_AGENT_PROMETHEUS_BIND9_EXPORTER_ADDRESS=
### the port on which the agent exports BIND 9 statistics to Prometheus
# STORK_AGENT_PROMETHEUS_BIND9_EXPORTER_PORT=

### Stork Server URL used by the agent to send REST commands to the server during agent registration
STORK_AGENT_SERVER_URL=http://10.64.35.31:8080

### skip TLS certificate verification when the Stork Agent connects
### to Kea over TLS and Kea uses self-signed certificates
# STORK_AGENT_SKIP_TLS_CERT_VERIFICATION=true
- 启动服务
systemctl enable isc-stork-agent.service
systemctl start isc-stork-agent.service
systemctl status isc-stork-agent.service

# 查看日志
journalctl -u isc-stork-agent.service -f
- 认证
- 权限【kea】
usermod -aG _kea stork-agent
chmod 644 /etc/kea/kea-ctrl-agent.conf
验证信息#

结语#
通过 Stork,运维人员可以直观掌握 DHCP 地址分配、子网与服务状态,实现集中监控、简化运维流程并提升网络服务的可控性与稳定性。
参考: